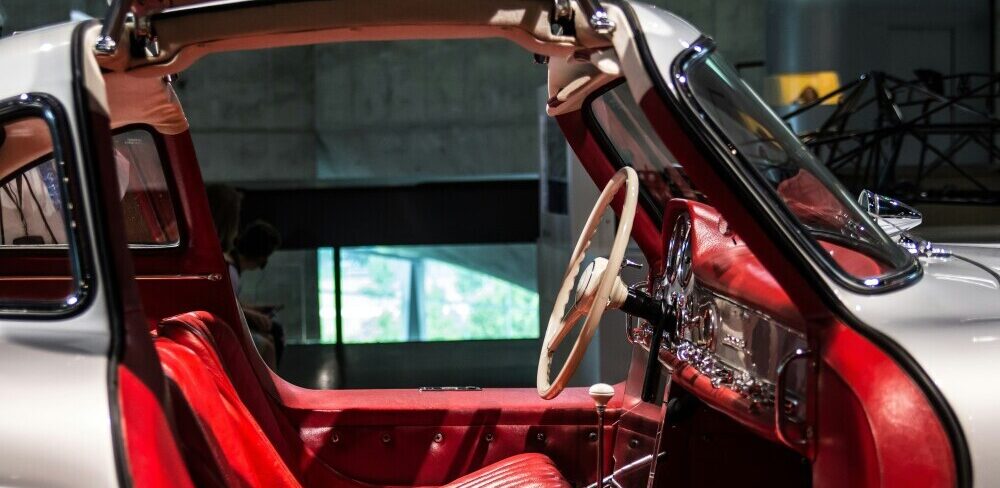

Restoring the leather seats in a classic Mercedes-Benz is one of the most rewarding aspects of a car restoration project. The seats are not just functional but a statement of luxury, craftsmanship, and timeless style. However, over the years, even the highest-quality leather can show signs of wear, such as cracks, fading, or dryness.
The Mercedes seats weren’t designed just for comfort. Mercedes had an eye on elegance, blending form with function in a way that’s stuck with collectors and enthusiasts alike. If you’ve ever sat in a vintage Mercedes, you know it’s not just about sitting — it’s an experience, a throwback to a time when cars were more than just transportation. Its smell fascinates!
In this guide, we’ll provide expert advice on how to restore your classic Mercedes leather seats to their original shape. Whether you’re tackling a small project or planning a complete restoration, these techniques will help you achieve a flawless, authentic finish while preserving the car’s heritage.
Why Leather Seat Restoration Matters
Leather seats are a defining feature of many classic Mercedes models, from the elegant W123 to the iconic 300SL Gullwing. Restoring them enhances both the aesthetics and the value of the vehicle. Proper restoration also ensures comfort, durability, and authenticity, making your driving experience as luxurious as intended.
Step 1: Assess the Condition of the Leather
Before starting any restoration, evaluate the current state of the seats to determine the scope of work.
Key Issues to Look For:
- Cracks and Tears: Small cracks can be repaired, but severe tears may require professional intervention.
- Fading: UV exposure often causes discoloration, especially on areas like the seatback and headrest.
- Dryness: Stiff or brittle leather indicates a lack of conditioning over time.
- Stains: Spills or dirt embedded in the leather can detract from its appearance.
Pro Tip: Take detailed photos of the seats before starting restoration. These will serve as a helpful reference throughout the process.
Resources:
- Inspection Checklist: Hemmings offers detailed guides for evaluating classic car interiors.
Step 2: Clean the Leather Thoroughly
Cleaning is the foundation of any successful restoration project. Removing dirt and oils ensures the leather is ready for repairs and conditioning.
How to Clean:
- Vacuum First: Use a soft brush attachment to remove dust and debris from seams and crevices.
- Use a Leather Cleaner: Apply a high-quality leather cleaner with a microfiber cloth. Avoid harsh chemicals that could damage the material.
- Wipe Down: Remove any residue with a clean, damp cloth. Allow the seats to dry completely before proceeding.
Pro Tip: Test the cleaner on a hidden area of the seat first to ensure it doesn’t cause discoloration.
Resources:
- Leather Cleaning Products: Leatherique provides cleaners specifically designed for vintage leather.
Step 3: Repair Cracks and Tears
Once the leather is clean, address any cracks or tears to restore the surface’s integrity.
Repair Techniques:
- For Minor Cracks: Use a leather filler to smooth out cracks. Apply thin layers and allow each to dry before adding the next.
- For Tears: Use a leather repair kit with adhesive patches to bond the torn edges. Sand lightly once dry to blend the repair.
- For Severe Damage: Consult a professional upholsterer who specializes in vintage leather restoration.
Pro Tip: Match the filler or patch color to the original leather for a seamless finish.
Resources:
- Repair Kits: 3M Leather Repair offers high-quality kits for classic car interiors.
Step 4: Restore the Color
Fading is one of the most common issues with classic leather seats, but restoring the original color can make them look new again.
Re-Dyeing Process:
- Choose the Right Dye: Use a leather dye that matches the original factory color.
- Prep the Leather: Apply a leather prep solution to remove any residual oils or old coatings.
- Apply the Dye: Use a sponge or airbrush for even application. Build up the color gradually with multiple thin layers.
- Seal the Surface: Once dry, apply a leather sealant to protect the new color and prevent fading.
Pro Tip: Work in a well-ventilated area and wear gloves to avoid staining your hands.
Resources:
- Leather Dyes: Colourlock offers a wide range of color-matching dyes for classic cars.
Step 5: Condition and Protect
Conditioning restores the leather’s softness and prevents future cracking or dryness.
How to Condition:
- Apply Leather Conditioner: Use a product designed for vintage leather and apply it evenly with a microfiber cloth.
- Let It Absorb: Allow the conditioner to penetrate the leather for several hours or overnight.
- Buff the Surface: Use a clean cloth to buff the seats to a soft, natural shine.
Pro Tip: Condition the leather every six months to maintain its suppleness and durability.
Resources:
- Conditioning Products: Griot’s Garage offers premium conditioners for classic car interiors.
Step 6: Maintain the Leather
After restoration, regular maintenance is key to preserving the results.
Maintenance Tips:
- Protect from Sunlight: Use sunshades or park in shaded areas to prevent UV damage.
- Clean Regularly: Wipe down the seats with a damp cloth to remove dust and dirt.
- Avoid Harsh Chemicals: Use only leather-safe products for cleaning and conditioning.
Pro Tip: Invest in custom-fit seat covers to protect the leather when the car isn’t in use.
Resources:
- Seat Covers: Covercraft provides custom seat covers for vintage Mercedes models.
When to Call a Professional
For extensive damage or rare leather types, consider consulting a professional restorer. They have the tools and expertise to handle complex repairs while preserving the car’s authenticity.
Finding a Specialist: Look for professionals who specialize in vintage Mercedes interiors and have experience working with classic leather.
Resources:
- Professional Services: Mercedes-Benz Classic Center offers expert restoration services.
Restoring the leather seats of your classic Mercedes is both an art and a science. By following these expert techniques, you can achieve a result that honors the car’s history while enhancing its beauty and value.
Take pride in your work, and enjoy the luxurious comfort of seats that look as good as they feel. With proper care, your restored leather will remain a highlight of your classic Mercedes for years to come.
Bonus: Cleaning and Maintenance: Ensuring Longevity of Classic Seats
You’ve put in the hard yards restoring those seats, so let’s keep them looking sharp with some regular cleaning and maintenance. Leather care is about being proactive to stop issues before they start.
First off, cleaning! Keep it regular but gentle. A simple wipe-down with a damp cloth every week can do wonders, but grab a leather-specific cleaner for deeper cleans. Avoid anything too harsh or loaded with chemicals that can strip the natural oils from the leather.
When it comes to maintenance, conditioning is your best friend. It’s like a moisturizer for your skin, keeping the leather supple and happy. Depending on your climate and usage, aim to condition every 3 to 6 months, but adjust as needed. Too often? It might go sticky. Too rare? Cracks could propagate again.
Don’t forget about the sun – leather and UV rays aren’t exactly best buds. If possible, use a sunshade or park in covered areas. If not, consider applying a UV protector specifically made for leather. This small step goes a long way in maintaining that rich, consistent color.
Got pets or kids? Life happens, and spills or scratches are par for the course. Keeping a leather repair kit handy can help when accidents happen. Be sure to dust and vacuum the seats often too, as dirt particles can act like sandpaper over time.
Incorporating these habits into your routine won’t just maintain your seats—they’ll extend their life, keeping your ride looking the part for years to come.
The Faux Leather Debate: Understanding Mercedes’ Choices
Let’s wrap it up by talking about that faux vs. real leather choice Mercedes makes. Some folks are all in for the genuine stuff, while others see the value in synthetics. It’s not as straightforward as real leather being better just because it’s natural.
Mercedes opts for fake leather, sometimes called MB-Tex, for several good reasons. For one, it’s more durable than you might think and can actually resist wear and tear better than real leather in some cases. It’s also got some perks like being easier to clean and maintain—major points if you’re all about convenience.
Then there’s the whole eco-friendly angle. Producing synthetic leather can often be less taxing on the environment than traditional leather production, which involves a pretty heavy-duty tanning process. Plus, you won’t have to worry about ethical concerns related to animal products with faux leather.
People’s perceptions are shifting, too. While some purists insist on using genuine leather for its authentic feel and smell, many car owners are starting to appreciate the practicality and performance of high-quality synthetics.
Looking forward, the trend in the auto industry seems to be moving towards sustainable and environmentally friendly materials. Mercedes, like many others, is experimenting with new tech and materials, which could mean even more innovative options for seat materials. Whether you’re a leather loyalist or open to faux, knowing why Mercedes makes these choices gives you insight into what you’re sitting on.